Secondary weapons can be bought with Crystals in Survival and Team mode. In Invasion mode, they cannot be bought with crystals and are instead dropped by aliens and Asteroids. Secondary weapons can really turn a game on its head, and tend to be very explosive.
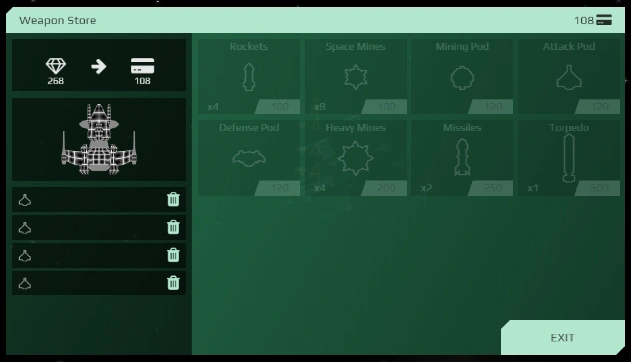
When secondary weapons are obtained, they go in slots on the right side of the screen. What tier Ship you have determines how many slots you have. Buying secondary weapons really depends what mode you are in. Currently, there are only two modes they can be bought in, survival and Team Mode. Press 'w' in survival and the menu will pop up. With it, you can convert your crystals to credits. You buy secondary weapons with these credits. In team mode, you simply go into your station. The weapons page will pop up, and converting crystals to credits upgrades your station. Buying weapons with your credits doesn't take crystals away from your station.
There are currently three types of secondary weapons: pods, propelled weapons, and mines. The latter two are deployed by pressing 'Alt'.
Dying will not affect the amount of credits you have. However, you lose any secondary weapons you have bought, and pods are dropped randomly. Propelled weapons and mines never drop.
Secondary weapons were added on 2017-10-10, replacing laser pods.
Pods[ | ]
Pods are small objects that orbit your ship and serve different kinds of functions. They will just sit there in space while not serving their function unless you are in combat or mining, depending on the use of the pod. They tend to stay near the back of your ship, especially while you are moving. Pods are destructible. They do not drop anything when they are destroyed. There are currently three kinds of pods.
| Type | Cost | Damage | Frequency | Shield |
|---|---|---|---|---|
| Mining | 120 | 10 | 1 | 50 |
| Attack | 5 | 2 | 70 | |
| Defense | N/A | 150 | ||
Mining Pods[ | ]
These pods always stay near the back of your ship, and face forward with your ship. When your ship fire, they fire, and make your damage per second go up a lot and make mining a lot easier. They do not damage other ships, so they are useless in combat, except maybe as tiny little weak shields at the back of your ship or making it seem like you have more firepower than you truly do/making it unclear which shots will hurt them, especially with the X-Warrior. They are common and helpful in Team Mode, especially while trying to upgrade the station. A Mining Pod shoots a single laser once each second which does 10 damage.
Attack Pods[ | ]
Attack pods are similar to mining pods. They stay near the back of your ship, and fire lasers, but that is where the similarities stop. The sole purpose of attack pods is to attack other ships. They will fire at any enemy ships in range, no matter if you are aiming or firing at the enemy ship. having a bunch of these will not help people teaming with you in Survival Mode. they don't target asteroids, but they can damage them when firing at a ship.
An Attack Pod shoots a single laser which deals 5 damage twice a second.These pods work well if you have a ship with a slow firing rate as in the O-Defender and Y-defender and is helpful as it changes your single shot ship into a pulse type jet.
Defense Pods[ | ]
Defense pods are very different from the other pods. They hover around your ship, and as soon as they register an enemy ship close to you, they will move in between you and the other ship, blocking their shots, and not yours. Defense pods have more health than other pods, but they will not protect you from running into asteroids. Explosive damage will go through them, so if your defense pod is hit by a rocket, missile, or torpedo, you will be affected by it, but not as badly as being directly hit. Defense pods only sense an enemy and block when they are close enough, so it is possible to shoot people and be hit when you are far apart. If you ram into someone with defense pods, your ship's front will go through their defense pods, allowing you to shoot them for a brief second.
It takes 120 gems to buy one pod. If a ship is destroyed while its pods are active, they have each a chance to drop and are collectable.
Propelled Weapons[ | ]
There are also three kinds of propelled weapons, namely rockets, missiles, and torpedoes. You launch them from your ship by pressing 'alt'. If you have multiple loaded, you can switch between them using the scroll wheel or Shift key. They also do knockback depending on their damage. All propelled weapons have a splash radius and will do damage in that radius when exploding. These weapons also have a cool down time. Rockets have the smallest, missiles the largest, and torpedoes have no cool down (only one per slot).
Based on their speed, these weapons will loosely follow enemy ships. When launched, they can be destroyed by enemy lasers. When destroyed, they will still explode and will likely still damage enemy ships due to their splash radius.
They go through friendly objects, both friendly ships (like lasers) and friendly stations (unlike lasers). This means that if your station is under attack on the other side, you can launch propelled weapons through the station to hit enemy players, although you cannot shoot them with lasers.
| Type | Cost | Qty | Frequency (Hz) | Damage | Splash Radius | Speed | Shield | Mass | Arming Delay (s) | Seeking | Agility |
|---|---|---|---|---|---|---|---|---|---|---|---|
| Rockets | 100 | 4 | 0.5 | 50* | 20 | 250 | 20 | 50 | 0 | Yes | 250 |
| Missiles | 250 | 2 | 0.2 | 150* | 30 | 160 | 75 | 100 | 1 | Yes | 200 |
| Torpedo | 500 | 1 | 1 | 500* | 35 | 140 | 300 | 200 | 2 | No | 20 |
* Damage is doubled when the targets are space stations.
Rockets[ | ]
These are the fastest but also the weakest propelled weapon. They do 50 damage, have no arming delay, a small splash radius and you buy them in packs of 4. A pack of rockets costs 100 credits.
Missiles[ | ]
These do 150 damage, come in packs of 2, have a 1 second arming delay and a medium splash radius and cost 250 credits.
But take note that its weakness is the very long cooldown.
Torpedoes[ | ]
These things are extremely slow, come in packs of one, do not home in on ships, and do 500 damage to ships/aliens, 1k damage to stations. You buy one for 500 credits.
Use these wisely, because at range it is impossible to hit someone. However, they do such extreme splash that even hitting an asteroid near an enemy will do extreme damage to them. Torpedoes are useful for destroying large groups of people in team mode, or quickly and fatally surprising someone ramming into you. Base nuking (sending 6 torps at one module of a base) is expensive but effective at draining gems or destroying a module quickly, although mines do twice as much damage for the same cost over a longer period of time.
Unfortunately, Torpedoes cannot be used at point blank range. They have to travel a little bit due to their 2 second arming delay before they will explode on impact. Heed this warning, or you will waste 500 credits on a failed attempt, and probably destroy a few asteroids far away. These are currently the only propelled secondaries that can be spam-fired in a barrage-like fashion even with global cooldown. They excel at base nuking in team mode especially due to there double damage to stations (tier 6 & 7 can hold 6, 1000 x 6 = 6000 damage on directly hit module, splash damage on nearby enemy ships and modules.) These also excel in ACW due to the large grouping of ships and quickly killing at least one, luck and density of cluster depending.
Mines[ | ]
Mines are stationary secondaries in Starblast.io. There are currently 2 types of mines you can purchase: Space mines and Heavy mines. Mines received an arming delay to prevent surprise instakilling (Getting a ship to follow you and then dropping a mine in their face). However, a new tactic is still possible. Buying multiple packs of space mines, and placing them all clustered up in 1 spot is a great way to instantly kill, depending on the number of mines, ANY ship in the game (Including Aries, but for one with full gems it takes 5 packs of small mines). Note that this only works properly in survival mode, as the mines will slowly levitate away in team mode, making for a much for suspicious pile of mines. They will also eventually blow up because of mine decay, which is 5 minutes by default.
While mines deal twice as much damage to a base as torpedoes for the same cost, the damage from mines might not apply all at once (depending on how noob the enemy team is), while torpedoes apply their damage almost instantly.
| Type | Cost | Qty | Frequency (Hz) | Arming Delay (s) | Damage | Blast Radius | Shield | Mass | Radius | Agility |
|---|---|---|---|---|---|---|---|---|---|---|
| Space Mines | 100 | 8 | 4 | 2 | 50 | 15 | 30 | 100 | 1.5 | 200 |
| Heavy Mines | 200 | 4 | 1 | 4 | 200 | 30 | 100 | 200 | 2.5 | 150 |
Space Mines[ | ]
Space Mines cost less than heavy mines but deal less damage to a relatively small blast radius.
Heavy Mines[ | ]
Heavy Mines do more damage, cost more, and have a longer arming delay than Space Mines. However, they have a much larger blast radius and damage, making them better for base nuking. Also, they are harder to shoot down as well. Both Space Mines and Heavy Mines have the same damage per cost (8 * 50 / 100 = 4 * 200 / 200).
Cuttlefish and Barracuda are good at this strategy.
Cells[ | ]
When you pick up a cell, you get two cells in one slot.
Power Cells[ | ]
Power Cells appear in Battle Royale and SRC. They restore energy when used.
Shield Cells[ | ]
Shield Cells appear in Battle Royale. They restore shield when used.
Capacity[ | ]
Each tier can only hold a limited amount of secondary weapons (or packs of them) equal to the tier number, except tier 7, likely because Tier 7 ships in Team mode cannot enter the depot.
As shown below, a ship of level L can hold secondaries.

| Tier | Capacity |
|---|---|
| 1 | 1 |
| 2 | 2 |
| 3 | 3 |
| 4 | 4 |
| 5 | 5 |
| 6 | 6 |
| 7 |